Dice Spells Review: Two Dice Against the Undead
Two dice a turn against undead whose own rolls already show: a Dice Spells review of a dark, heavily inked dice roguelike.
Game at a glance
Dice Spells
8.5/ 10
Our score
Board games are making the jump to phones, and that trend is on the rise.
In this article6 sections
Hold a die, read the panel that spells out its face, then move it onto an undead enemy or onto your own knight. That is a turn in Dice Spells, a dark dice roguelike for mobile shelved with other dice games like monopoly go, and one more board-game idea carried over to phones.
We played Levels 1 to 3 on its Holloweye Castellum map, plus the opening turns of the two-enemy fight that follows. In play it resembles Slay the Spire, with roguelike fights strung into stage-by-stage progress, and its dice-rolling gameplay is really interesting.
Two dice against an undead’s open roll
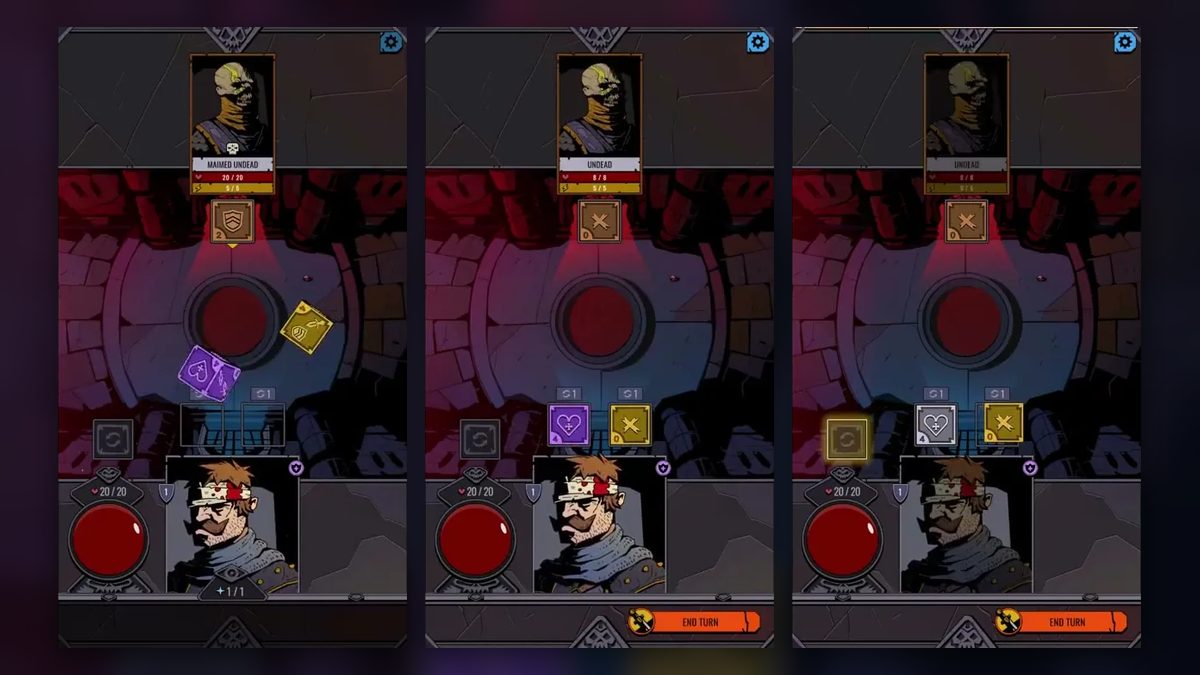
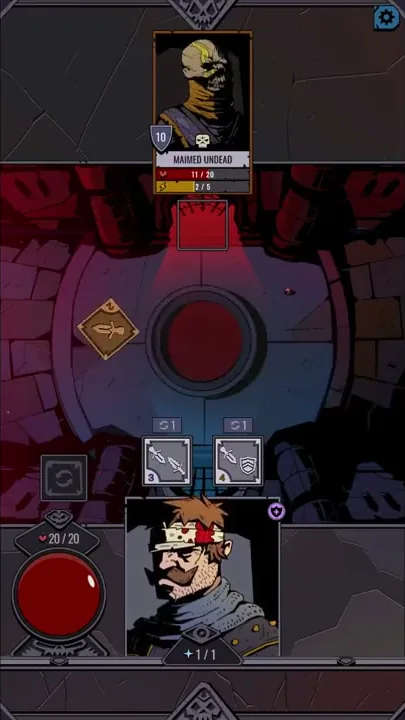
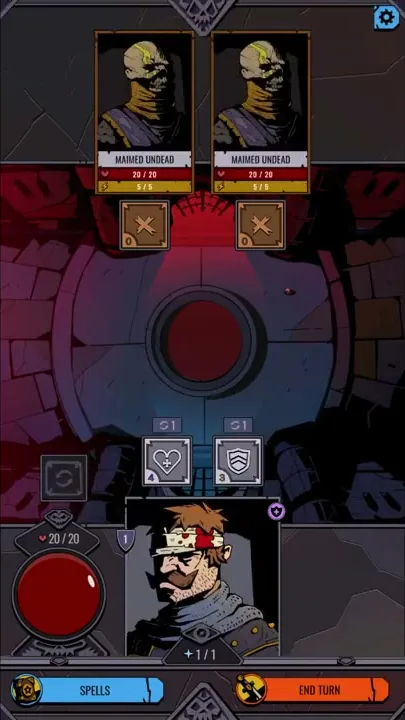
A fight fills one portrait screen. Enemy portrait cards line the top, and a round stone arena with a red disc takes up the middle. The knight’s portrait sits at the bottom beside a red health orb, with an orange END TURN button at the bottom right and a settings gear at the top right. The goal, printed on the level popup and the results screens, is “Defeat all enemies.”
Each enemy card shows a name above two bars: a red health bar marked with a heart, and a yellow bar with a lightning icon that counts out of 5. A tan die sits under the card. When the enemy rolls, its slot turns red while that die tumbles across the arena, and the result then stays under the card for as long as the knight’s dice are in play.
Faces seen on the enemy’s die include a dagger and a shield, each marked 2, plus a blank X marked 0. At some points while the enemy’s dagger was showing, a red diamond with a minus number sat at the top-left of the knight’s portrait (-2 partway through Level 1, -4 in Level 3); it was gone again once a shield face had been played. In Level 3 the Maimed Undead’s card also carried a shield badge of 10.
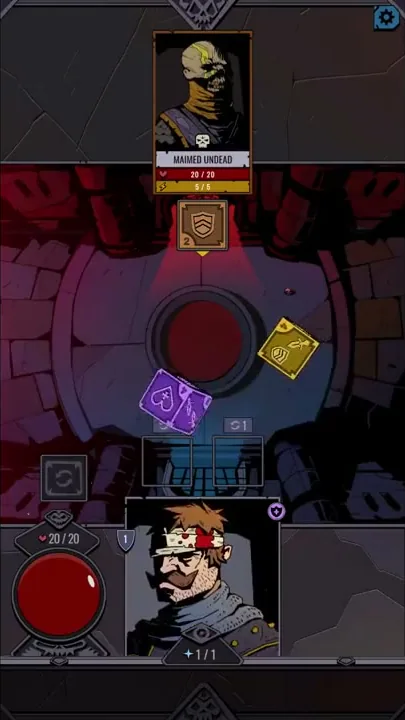
The knight answers with two dice, one purple and one yellow. They tumble across the arena and settle into two slots above the portrait, several times under a parchment banner with a short line such as “Let the heads roll” or “Slice and dice.” Each face shows an icon with a number in its lower-left corner, and a die turns gray once it has been played. During one Level 3 roll the yellow die appears as a full cube mid-tumble, with an X face and a dagger face both in view.
Control is by touch. Holding a die draws it out of its slot so it can be moved toward a target, and while it is held, a parchment panel across the top of the screen lists that face’s cost and target along with its effect. A tutorial box in Level 3 puts it this way: “When holding a dice its current side details are displayed on the top of the screen.” The same goes for the enemy’s dice.
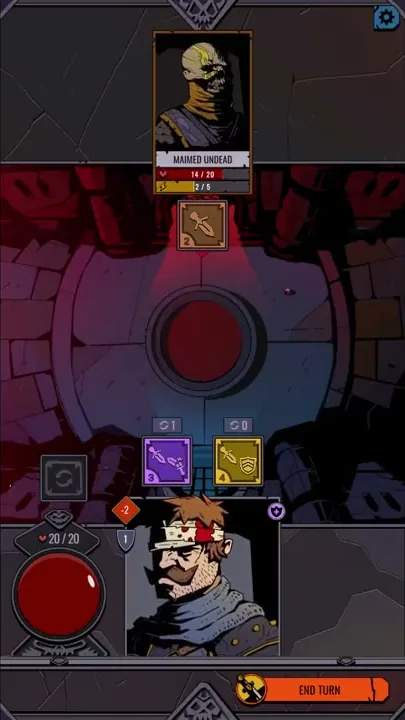
Blade faces come as a single dagger or as crossed blades, and the yellow die also has a sword paired with a shield. Holding the purple crossed blades, marked 3, opens a panel with Cost 3 and the target “Single enemy.” Next to “Damage” the panel shows “Apply 1,” over the line “Deal 30% less damage rounded down.” The number on a held face matches its Cost, here and on the sparkle face covered below.
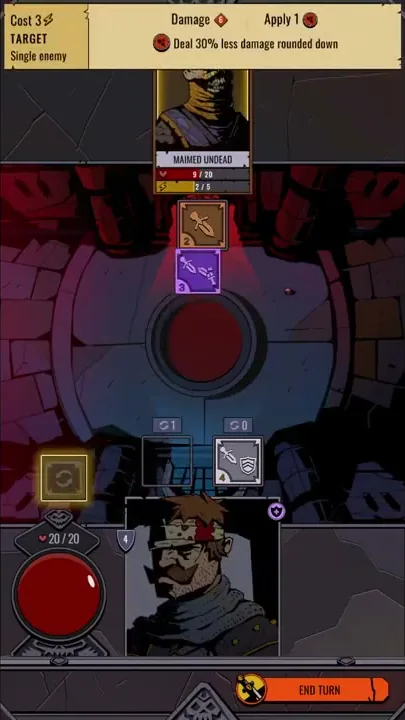
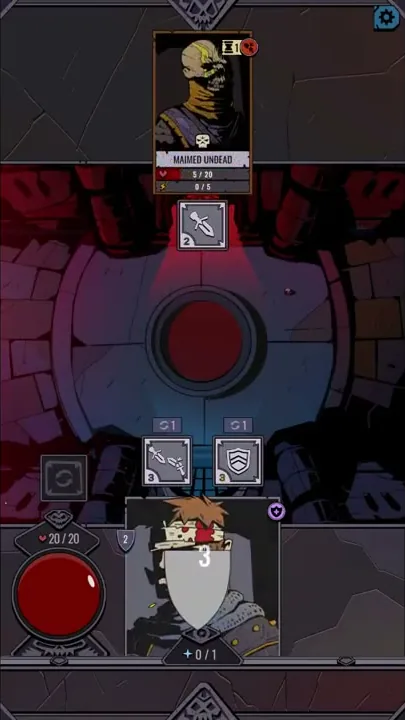
The Maimed Undead in Level 1 stands at 14 / 20 partway through the fight, its dagger 2 showing, while the knight’s dice show a purple crossed blades 3 and a yellow sword-with-shield 4. With the yellow die gone gray, the enemy has dropped to 9 / 20. Once both dice are spent it is down to 3 / 20, and an hourglass and a red circle have appeared at the top corner of its card. The next pair comes up shield 3 and dagger 3, and the fight ends on a results screen headed YOU CONQUERED.
Both dice carry shield faces marked 3. A small shield badge beside the knight’s portrait shows a number that moves during play: it rose after the sword-with-shield face was played in Level 1, and again after a shield face went down in Level 2. In Level 3, with a shield face already played, a large white shield marked 3 covers the knight’s portrait.
A purple face showing a heart with a plus sign, marked 4, came up in Level 2 and again in the two-enemy fight. Once it had been played in Level 2, the knight’s health was still full.
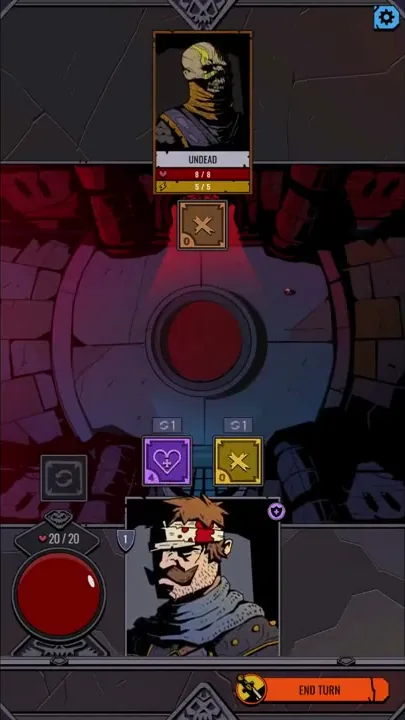
The purple die also has a sparkle face marked 4. Its panel lists Cost 4 and the target “Self Hero,” with the effect “Clear all negative effects (debuffs).” While it is held, the knight’s portrait gets a yellow frame.
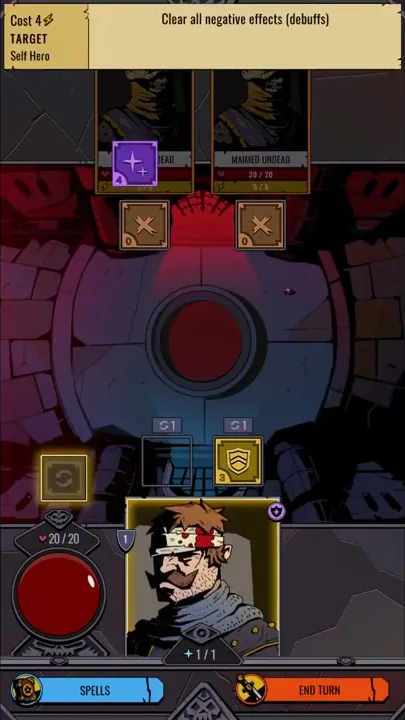
Each slot has its own reroll counter, marked with a circular-arrow icon, which drops when that die is rerolled. The square reroll button to the left of the dice lights up while a die is held or raised. Some faces are nothing but an X marked 0: early in Level 2 the yellow die landed on one with a reroll left, was raised, and came back as a shield 3 with its rerolls used up.
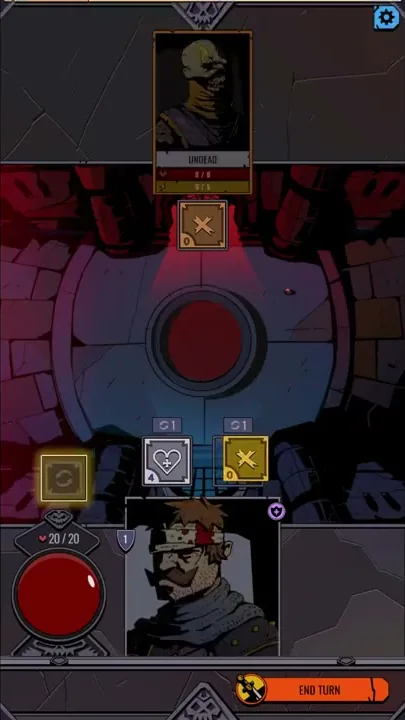
Once both dice are used, a “Brace yourself” banner crosses the arena. The enemy’s die goes gray before it rolls again, and a fresh pair comes in for the knight. Dice Spells gameplay repeats that exchange until the enemy card is gone, leaving a red number where it stood, and then the results screen opens.
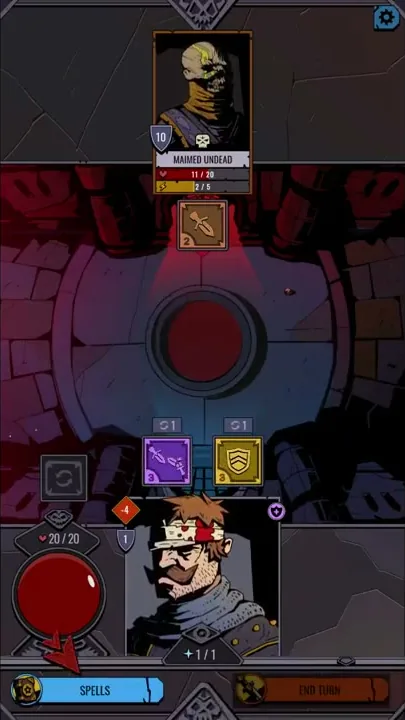
Level 3 puts a blue SPELLS button at the bottom left and a counter with a small star-like icon under the knight’s portrait. A red tutorial arrow points at SPELLS while END TURN is dimmed. A moment later the star counter is empty, and the enemy’s card no longer shows its shield badge of 10. The counter is full again when the next fight begins.
One Maimed Undead, then two at once
The knight meets a single enemy card at a time until the board doubles. Level 1’s Maimed Undead has a maximum health of 20, and early in Level 2 a plain Undead stands at 8 / 8. Early in Level 3 the Maimed Undead is back at 20 / 20, now with a small skull icon on its portrait.
In the fight after Level 3, two Maimed Undead stand side by side, each at 20 / 20 with its own tan die. Later in that fight the left one is down to 8 / 20 with status icons on its card, while the right one is untouched.
Story and tutorial text come from a hooded, white-bearded old man, whose tutorial box turns up in Level 3, the same level that gains the SPELLS button. Between Level 3 and the two-enemy fight, a comic panel marked page 1 / 5 has the old man warn that Holloweye Castellum is the only way across the border, and that nobody there will greet a royal army knight with wine and a plate of grapes.
The levels pair the First Win condition, “Defeat all enemies,” with a separate challenge. After Level 1 the challenge was that same condition. The Level 2 popup hid its challenge behind “Win to reveal challenge,” and Level 3 asked for a “Win after losing 15 Health.”
Levels sit as numbered nodes along a path on the Holloweye Castellum map, which carries a star counter out of 50 in its header. Nodes 1 and 2 sit low on the map with 7 and 8 farther up, some with padlocks beside them. Before Level 2, a parchment popup under a red LVL 2 seal lists two rewards: an axe card marked 10 for First Win and a coin pile marked 10 for the Challenge. Below them come “ENCOUNTERS: 1” and a BATTLE! button.
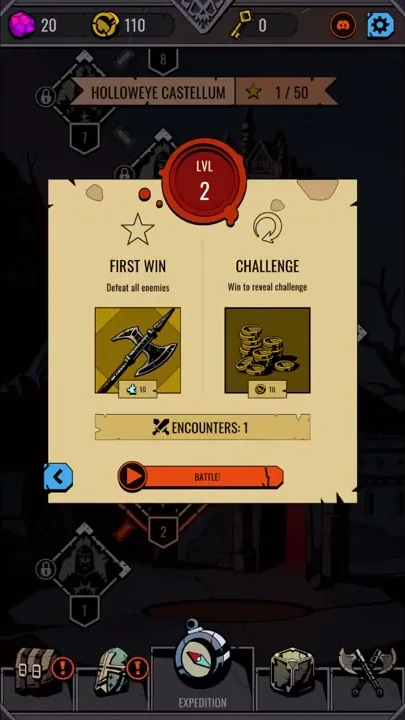
Five tabs run along the bottom of the map. The center one, a compass labeled EXPEDITION, is selected; the other four are unlabeled icons, a chest and a helmet on the left and a cube and crossed axes on the right. The chest and helmet tabs carry red “!” badges.
A top bar on the map and results screens holds counters for magenta gems and gold coins with a key counter beside them, plus a red round icon and the settings gear. The coin total was higher after Level 3 than after Level 1.
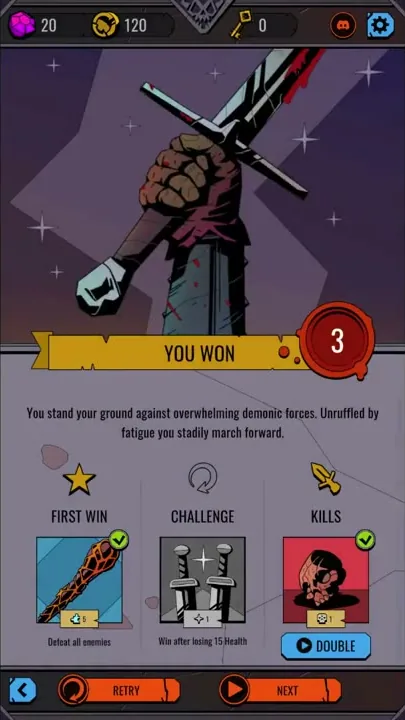
The results screens show a raised fist gripping a bloodied sword among sparkles, with the level number in a red wax seal and a line of text below. Level 1’s is headed YOU CONQUERED and Level 3’s YOU WON. Underneath sit three reward columns headed FIRST WIN, CHALLENGE and KILLS, each with a picture card that takes a green check when earned.
After Level 1 all three were checked. Its First Win card showed the knight’s portrait with a star badge and its Kills card a red skull, while Challenge showed a coin pile. After Level 3, First Win (now an orange-and-black club) and Kills got their checks, but the two-swords Challenge card did not. A blue DOUBLE button with a play icon sits under the Kills reward on both screens, with RETRY and NEXT along the bottom.
Grim ink and dice-driven turns
We find the gameplay really interesting and are fairly optimistic about this dice-rolling rule format. Throwing a varied set of dice drives both the tactics and the outcome of each turn. In the two-enemy fight one pair came up heart 4 and shield 3. The next turn gave sparkle 4 and shield 3, and the one after that crossed blades 3 and dagger 3.
In play it is similar to Slay the Spire: roguelike fights strung into stage-by-stage progress. The faces carry a Cost and the knight has an END TURN button, while the fights sit as numbered nodes on the castle map. Its roguelike label also puts Dice Spells near Capybara Go!, Habby’s light roguelite adventure, on the shelf of games like capybara go.
The drawing style is a bit like the dark look of Darkest Dungeon-style games. Portraits use heavy black ink and a muted palette lit by red and purple, from the bandaged, skull-faced undead to the mustached knight in a bloodied headband. Hits leave red slash marks across an enemy portrait, and a yellow swipe crosses the knight’s portrait as new dice come in.
Beyond this dark take, we also have high hopes for the same direction done with a casual look and a lighter touch.
Spells and map tabs not shown
We have no criticism of Dice Spells. The levels we played never show the SPELLS menu itself or what a spell does, and they leave the four unlabeled map tabs unopened and the DOUBLE button unpressed. What gems and keys pay for is not shown either. Those levels also did not show branching routes or dice upgrades, nor a defeat: at the last point seen in the two-enemy fight, the knight’s health was still full.
Reading open rolls and spending rerolls
A turn here is mostly reading and choosing. The enemy’s result already sits under its card, and holding a die lays out its cost and effect at the top of the screen. The player then decides whether a reroll is worth spending before sending each die to an enemy or to the knight. That rhythm suits a taste for planning against a threat that is already in view, with two faces to work with. Heavy ink, bandaged undead and banners like “Let’s spill some blood, shall we?” suit a taste for grim fantasy.
Verdict
Dice Spells builds its fights on a toss of assorted dice, and the gameplay that comes out of it is really interesting. Its drawing style leans toward Darkest Dungeon’s darkness, and in play it sits close to Slay the Spire. We are fairly optimistic about the rule format, and have high hopes for this direction with casual art and a lighter approach. It also arrives as more tabletop designs are reworked for mobile, a shift that has been picking up lately.